Showing posts with label classroom organization. Show all posts

Monday, September 3, 2012

Made 4 Math - Decorated Clipboard

I use a clipboard when I walk around and check homework, but who wants to use an ugly brown clipboard?? Last summer I covered two of my clipboards with different scrapbooking paper, but I wanted to re-cover one of them because I wasn't happy with the way it turned out.

I started by ripping off as much of the old paper as I could and then using some sandpaper to try to make it an even surface again.


Then I went through all of my scrapbooking supplies looking for cute paper for both the front and back of the clip board. My clipboards are a little longer than 12 inches so I have to use two pieces of paper if I want to cover the entire surface. While going through my scrapbook stuff I found this SUPER cute paper that I NEED to find something to do with!

And I must really REALLY like it because apparently I bought another sheet at some point!


So these are the two color combo options I was debating between. I ended up choosing the pieces on the left.


Once I had my paper selected I traced around the clipboard and cut off the excess.


I decided to do the front and back of the clipboard in reverse pattern.

Now it's time for some Mod Podge!!

Ok so now here is the sad part of my story...my paper kept puckering as I was trying to put it on. I was trying to flatten it out by using the paint brush, but I ended up brushing so hard the color on the paper started to rub away :( 

But I didn't give up! I ripped off the paper and tried again....and again...so then I thought to myself "maybe the paper is too thin and that's why it is puckering" so I chose a thicker piece of scrapbook paper and tried AGAIN. Lesson learned...thicker worked!!!! I also decided to just paint the front of the clipboard instead of trying to cut paper out to go around the "clip" part of the clip board.

Aaaaaaaaaaand here is my finished clipboard. 


 So cute!! And I actually like this paper better than the blue and the green polka dots :) SUCCESS!!!

Sunday, August 26, 2012

An Organized Classroom

Being organized is probably one of the things I am best at. I'm not sure when I became super organized, but basically life doesn't make sense to me if it's not organized. Like right now I'm sitting here looking at our DVD case and the DVDs are OBVIOUSLY in alphabetical order...to me that just makes sense, why wouldn't you put your DVDs in alphabetical order?? I know plenty of people that don't, but I wonder how they find the DVD they're looking for without having to look throughout the entire case. Which basically leads me to why I am organized and why I enjoy (need?) to be organized...I like to know where things are because in the end it saves me time and effort. It's that simple.

Being a super (obsessive?) organized person transfers into my classroom as well. My students ALWAYS comment about how organized I am and my hope is that a little bit of that rubs off on them. The way I keep organized in my classroom basically comes down to three things: 1. EVERYTHING needs/has a home (which is also labeled), 2. color coding and 3. making lists.

In my classroom there isn't anything that doesn't have a permanent "home" and I make the effort to make sure everything gets put back where it belongs. By doing so I never have to wonder where something is and I hardly ever misplace things because I know where it belongs and it's there. A lot of my organization has developed based on a need for a "home" for something. Before I started teaching I don't think I could have imagined most of the things I would need to have a place for, but as the need arises I create it or I give it a home. For example, I have two vinyl (vinyl because they are more durable and they take a beating throughout the school year) folders for work that needs to be corrected and work that needs to be entered into the grade book. I made those folders because those papers needed a home and I didn't want to lose papers.

I LOVE to use color to help keep me organized as well. Each year I assign each of my preps a color and then each of my classes for that prep an associated color. For example this year Geometry is green, Honors PreCalc is purple and Algebra 2 is orange. For my one Geometry class I use green, for one Honors PreCalc class I use purple and for the other I use blue, and for one Algebra 2 class I use yellow and for the other I use orange. Each of these classes has a colored folder (this year I made 4 pocket folders!) that I use for attendance, homework, seating charts, etc.. I also obsessively use colored paper clips for everything. Again, anything associated with a certain class gets "their color" paper clip. I use them in my "to get corrected" folder to keep different classes and assignments separated. I also use them in a folder that I keep for work that needs to be made up.

Lists also play an important part in keeping me organized. I like keeping a running "to do" list so that I don't forget something. It also helps to keep my mind freed up, prioritize tasks and have a big picture looks at what needs to be done. There is also no better feeling than crossing things off of my to do list :)

I wish I had pictures to help show some of the ways that I organize, but my classroom is still a huge mess and in the process of getting ready for day one. I might update later with pictures once I am more settled in.


Monday, August 6, 2012

Made 4 Math - 4 Pocket Folders


Look at all of the awesome stuff I scored at Staples for less than 7 bucks!! The spiral notebook is for my "to-do list" that I keep on my desk (if it's not on a list and not RIGHT in front of my face I always seem to forget to do things), the tissues are for some "teacher survival kits" I'm working on (more on that later), the index card holders don't have a definite use yet, but I'm sure I'll figure out something to do or someway to organize with them, aaaaaaaaand the folders are for my #made4math project!!!


Every year I keep a folder for each of my 5 classes where I usually keep track of their homework, attendance, seating charts and any quizzes or tests they have returned to me (If they fail a test or a quiz they have to bring it home and have it signed by a parent and then I make a copy for myself). I usually used the folders with fasteners in the middle so that I could use the folders for more than just two things (in the two pockets). My seating chart (printed from PowerSchool) went inside a page protector and that got put in between the fasteners along with the weekly attendance. If I'm being honest here half the time (ok ok...more than half the time) the attendance sheets never made it between the fasteners because it was such a pain to unfasten them, insert the sheet of paper, and then refasten them each week. This made for messy folders with papers just shoved in the middle and messy doesn't make for a happy and calm Ms. Mac. 

So when I saw a pin of 4 pocket folders on Pinterest from Ms. M's blog I just KNEW it was something I would incorporate into my classroom this year. 

Obviously for this project you need a couple sets of two pocket folders. I got five sets of two since I have five classes. I also used a single hole punch instead of a three-hole punch because I wanted a little more control over where the holes were on the folder. I also recommend using a pencil to make your life a little easier. 

I started with two folders - one with fasteners and one without. On Ms. M's tutorial she used different colored folders, but my two folders are the same color because it would drive me nuts if they weren't!!

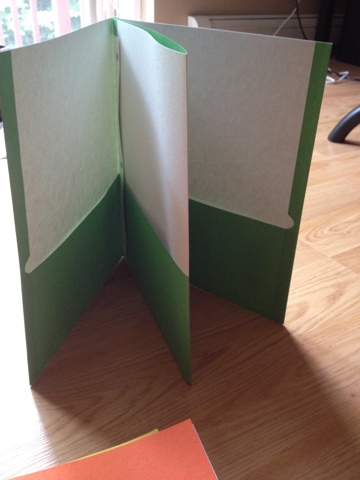
I took the folder without fasteners and folded it inside-out...

Now I have to decide how I wanted to put the two folders together...do I want the fold facing in? 

Or facing out? I picked out. Side bar - Does anyone else like to do their projects on the floor? For some reason I would rather be on the floor than at a table. 

To make it easier for myself and to make sure my punched holes matched up to the holes on the "outside" folder, I used a pencil to trace where the holes should get punched. At this point I learned by trial and error that you should trace the holes from the back of the fasteners and not the front because you want the holes to be in line with where the metal piece needs to go through. I ended up having to re-punch the yellow one, but at least it was possible to re-punch and I didn't have to scrap it altogether!

This is Loki. He decided to help me in the middle of my project by laying on top of all of my newly created 4 pocket folders. I guess that's what I get for working on the floor! ha

Final product!! :)

I can't wait to see how well these work out this year!!