Showing posts with label #made4math. Show all posts

Monday, September 3, 2012

Made 4 Math - Decorated Clipboard

I use a clipboard when I walk around and check homework, but who wants to use an ugly brown clipboard?? Last summer I covered two of my clipboards with different scrapbooking paper, but I wanted to re-cover one of them because I wasn't happy with the way it turned out.

I started by ripping off as much of the old paper as I could and then using some sandpaper to try to make it an even surface again.


Then I went through all of my scrapbooking supplies looking for cute paper for both the front and back of the clip board. My clipboards are a little longer than 12 inches so I have to use two pieces of paper if I want to cover the entire surface. While going through my scrapbook stuff I found this SUPER cute paper that I NEED to find something to do with!

And I must really REALLY like it because apparently I bought another sheet at some point!


So these are the two color combo options I was debating between. I ended up choosing the pieces on the left.


Once I had my paper selected I traced around the clipboard and cut off the excess.


I decided to do the front and back of the clipboard in reverse pattern.

Now it's time for some Mod Podge!!

Ok so now here is the sad part of my story...my paper kept puckering as I was trying to put it on. I was trying to flatten it out by using the paint brush, but I ended up brushing so hard the color on the paper started to rub away :( 

But I didn't give up! I ripped off the paper and tried again....and again...so then I thought to myself "maybe the paper is too thin and that's why it is puckering" so I chose a thicker piece of scrapbook paper and tried AGAIN. Lesson learned...thicker worked!!!! I also decided to just paint the front of the clipboard instead of trying to cut paper out to go around the "clip" part of the clip board.

Aaaaaaaaaaand here is my finished clipboard. 


 So cute!! And I actually like this paper better than the blue and the green polka dots :) SUCCESS!!!

Monday, August 27, 2012

Made 4 Math - Whiteboards

I had been seeing a lot of talk and postings about making individual and/or group whiteboards and decided it was something I could use in my classroom. I went to Home Depot looking for the large sheets of whiteboard I had read about, but nobody there knew what I was talking about. Twitter to the rescue - I just tweeted a quick question about whether I should be looking at Home Depot or Lowe's and within minutes I had my answer (thanks to @approx_normal and @aanthonya) - and off to Lowe's I went.

Once I found the large sheets of whiteboard (32" x 48") the nice guy working there cut them into six 16" x 16" boards. I now had whiteboards my students could use for group work and it only cost me like $10!!


The edges of the boards were a little rough and @aanthonya suggested I cover them with duct tape. We had a discussion about how to do this since I had trouble with duct tape and corners on the last project I attempted (I do NOT like when things aren't perfect). 

I started with a piece of duct tape the same length as one of the sides and I wrapped it around the edge - half sticking to the front and half sticking to the back


Then I just repeated this for the other three sides.


Here is a close up of the corner where the duct tape is overlapping. So much better than trying to wrap a single piece around the corner - I tried this with a clipboard and it was just a horrible mess. 

Yay class set of groupwork whiteboards!!! :)

Monday, August 20, 2012

Made 4 Math - Teacher Survival Kits

At the beginning of the summer I saw these super duper cute "teacher survival kits" on pinterest and I knew I wanted to make them as back to school gifts for my department members.

At the beginning of each school year I buy all sorts of random supplies that I need or that kids always ask for (lint rollers, hand lotion, tide to-go, etc...) so I thought I would also incorporate some of those ideas into my teacher survival kits as well.

I got pencil cases at staples for only 50 cents each and then have been picking up the stuff for inside all summer long.


Included in the kits:
  • a bag of popcorn - one of my favorite snacks
  • toothbrush, travel toothpaste and floss - I brought one to work before a dentist appointment and have actually used it fairly often
  • a pack of gum
  • lint roller - this is one of the things that the kids ask for fairly often and are usually surprised that I have one
  • a packet of energy drink mix (like the kind you mix into a bottle of water) - when they need a little pick me up
  • tissues
  • ibuprofen
  • defense halls - need that vitamin c to keep from getting sick from the kiddos!
  • hand sanitizer - again to keep away the germs
  • chapstick - am I the only one obsessed with chapstick? I found at least 6 different ones in  my desk the other day when I was cleaning it out...
  • nail file - only for the female members of the department...Is that being sexist?
  • clif bar -  not pictured, but I will be adding tomorrow after to my trip to costco
Can't wait to give them!!

Monday, August 13, 2012

Made 4 Math - Absent Students


When you have over 100 students it can be difficult to keep track of who was absent when and what they missed while they were out. To help me keep my sanity, I put most of the responsibility on the students to find out what they missed and how they will catch up.

I have a cork board set up RIGHT next to the door to help manage the system (totally stolen from a former colleague...thanks Forger!) that I use for absent students.


On my end of this system, if a student misses a test, quiz or any other sort of major assessment I immediately write their name on the assessment, put it in a folder (specifically for make up work, color coded by class obviously!), and then write their name (along with the date they were absent) on the small dry erase board near the door. 


The reason I keep this board right next to the door is because the students must walk by it before leaving class and my hope is that they notice their name. Obviously I'm actually hoping they already realized they missed something when they were absent, but some students seem to (intentionally?) forget. Again, I also do this so that the students are responsible for coming to me about missing something and I don't have to chase them around trying to get them to make up their work. 

Once a student comes to me about their missing work, we work out a time together for them to make up their assignment and they sign up on the calendar below the "You missed something!" board. 


This calendar is also placed right near the door as a reminder to those students that have scheduled a time to come see me. On the calendar I also include times/periods that I am not available due to meetings or other personal obligations so that students know not to sign up for those times. This calendar is VERY helpful to me as well because I occasionally forget that a student has scheduled a time with me and it serves as a reminder.

Once a student has completed their assignment their name is erased from the board. This system definitely isn't perfect. Sometimes a student's name can be on the board for days without them approaching me about their assignment. At this point I do have to remind the student that they missed something and get a time scheduled for them to make it up. 

When a student does come to make up their assignment (or comes for the extra help they scheduled) I cross off their name and if a student doesn't show up I highlight their name on the calendar. If a student's name gets highlighted I remind them that they were supposed to come see me and reschedule a time. These calendars are really multi-functional because I also keep them after the month is complete and I have documentation of when students have come to see me and haven't come. 

Does your school have a policy about the length of time students have to make up work? Is it strictly enforced? How long do you give you students to make something up?
http://ecx.images-amazon.com/images/I/413eMLXBqGL._SL500_AA300_.jpg

Monday, August 6, 2012

Made 4 Math - 4 Pocket Folders


Look at all of the awesome stuff I scored at Staples for less than 7 bucks!! The spiral notebook is for my "to-do list" that I keep on my desk (if it's not on a list and not RIGHT in front of my face I always seem to forget to do things), the tissues are for some "teacher survival kits" I'm working on (more on that later), the index card holders don't have a definite use yet, but I'm sure I'll figure out something to do or someway to organize with them, aaaaaaaaand the folders are for my #made4math project!!!


Every year I keep a folder for each of my 5 classes where I usually keep track of their homework, attendance, seating charts and any quizzes or tests they have returned to me (If they fail a test or a quiz they have to bring it home and have it signed by a parent and then I make a copy for myself). I usually used the folders with fasteners in the middle so that I could use the folders for more than just two things (in the two pockets). My seating chart (printed from PowerSchool) went inside a page protector and that got put in between the fasteners along with the weekly attendance. If I'm being honest here half the time (ok ok...more than half the time) the attendance sheets never made it between the fasteners because it was such a pain to unfasten them, insert the sheet of paper, and then refasten them each week. This made for messy folders with papers just shoved in the middle and messy doesn't make for a happy and calm Ms. Mac. 

So when I saw a pin of 4 pocket folders on Pinterest from Ms. M's blog I just KNEW it was something I would incorporate into my classroom this year. 

Obviously for this project you need a couple sets of two pocket folders. I got five sets of two since I have five classes. I also used a single hole punch instead of a three-hole punch because I wanted a little more control over where the holes were on the folder. I also recommend using a pencil to make your life a little easier. 

I started with two folders - one with fasteners and one without. On Ms. M's tutorial she used different colored folders, but my two folders are the same color because it would drive me nuts if they weren't!!

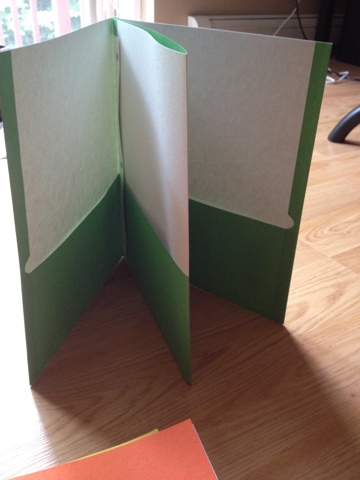
I took the folder without fasteners and folded it inside-out...

Now I have to decide how I wanted to put the two folders together...do I want the fold facing in? 

Or facing out? I picked out. Side bar - Does anyone else like to do their projects on the floor? For some reason I would rather be on the floor than at a table. 

To make it easier for myself and to make sure my punched holes matched up to the holes on the "outside" folder, I used a pencil to trace where the holes should get punched. At this point I learned by trial and error that you should trace the holes from the back of the fasteners and not the front because you want the holes to be in line with where the metal piece needs to go through. I ended up having to re-punch the yellow one, but at least it was possible to re-punch and I didn't have to scrap it altogether!

This is Loki. He decided to help me in the middle of my project by laying on top of all of my newly created 4 pocket folders. I guess that's what I get for working on the floor! ha

Final product!! :)

I can't wait to see how well these work out this year!!